Connecting to the Turing’s Cray Urika-GX service
This chapter explains how to connect to the Turing’s Cray Urika-GX service (“Urika”). This requires a user account on BOTH Urika and hydra-vpn.epcc.ed.ac.uk. See the chapter Alan Turing Institute Cray Urika-GX Service for instructions on how to get these user accounts.
Access to Urika is via SSH. The applications software on Urika itself can be accessed via a web browser. This chapter explains how to setup an SSH tunnel from hydra-vpn.epcc.ed.ac.uk to Urika so that a web browser can be used to access the applications software. It also explains how to access Urika’s command line directly.
An overview of how to connect is as follows. Instructions are provided for:
- Windows: using MobaXterm (recommended), PuTTY or the ssh client in Git for Windows SSH clients and Mozilla Firefox, Internet Explorer and Google Chrome web browsers.
- MacOS and Linux: using ssh client and Mozilla Firefox web browser.
Other SSH client software and web browsers can also be used if they are suitably configured.
Connecting involves the following steps:
- Set up an SSH tunnel to Urika.
- Modify the hosts file.
- Configure web browser to access Urika’s applications software.
- Use web browser to access Urika’s applications software.
Alternatively you can:
In the following:
- Replace
your-hydra-vpn-usernamewith your hydra-vpn.epcc.ed.ac.uk username. - Replace
your-urika-usernamewith your Urika username.
Set up an SSH tunnel to Urika
If you are a Windows user, you can do one of:
- Set up an SSH tunnel using MobaXterm.
- Set up an SSH tunnel using PuTTY.
- Set up an SSH tunnel using PuTTY and the Command Prompt.
- Set up an SSH tunnel using Git for Windows.
If you are a MacOS or Linux user, you can:
Set up an SSH tunnel using MobaXterm
Start MobaXterm.
Click the ‘Tunnelling’ icon:

The MobaSSHTunnel window will appear.
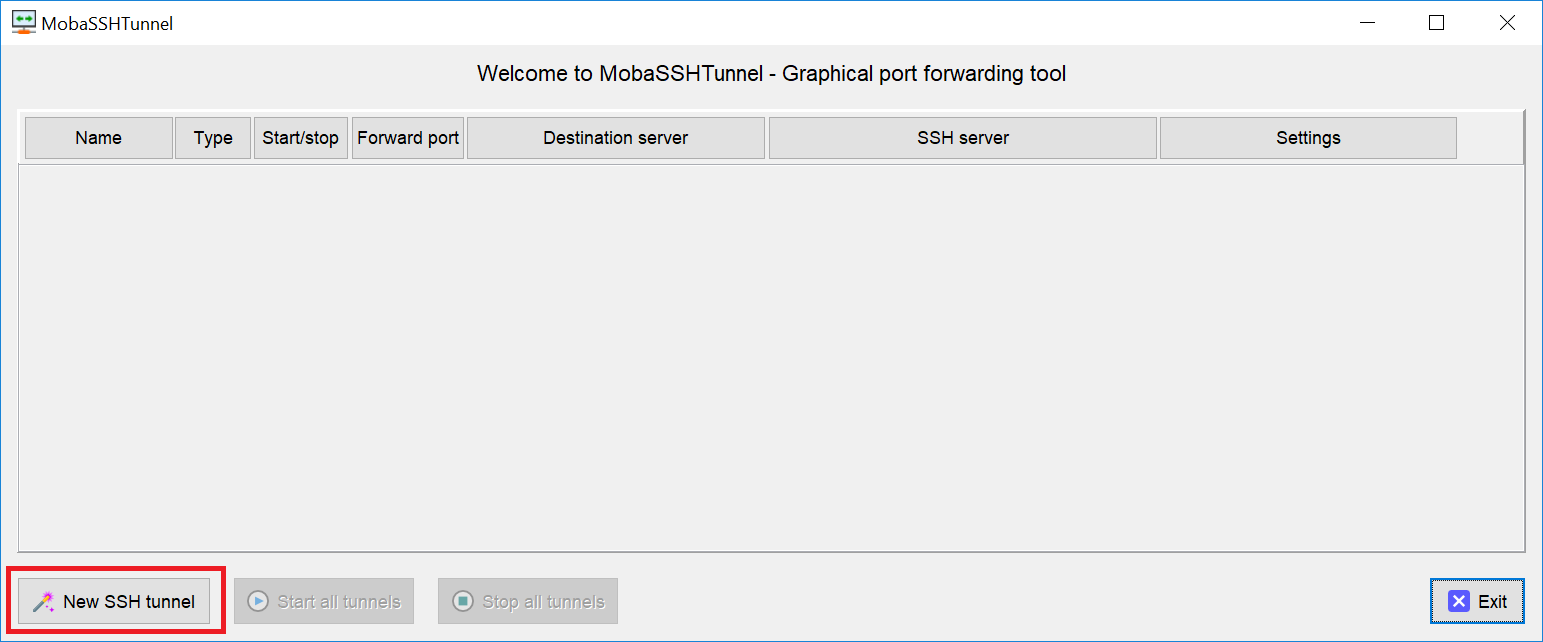
Click the ‘New SSH Tunnel’ button.
The SSH tunnel window will appear.
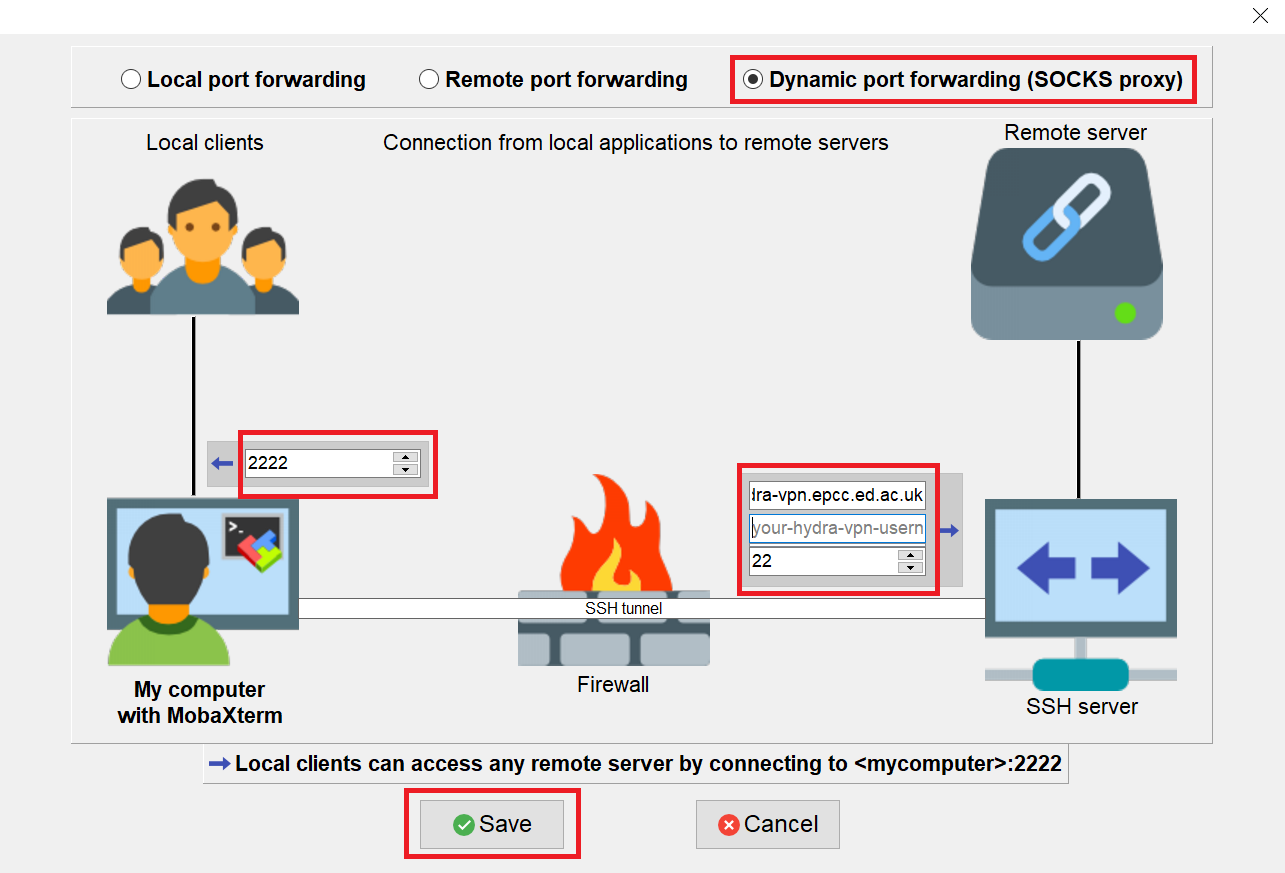
Select ‘Dynamic port forwarding (SOCKS proxy)’.
Enter the following configuration:
- ‘Forwarded port’:
2222 - ‘SSH server’:
hydra-vpn.epcc.ed.ac.uk - ‘SSH login’:
your-hydra-vpn-username - ‘SSH port’:
22
- ‘Forwarded port’:
Click the ‘Save’ button.
Back in the MobaSSHTunnel window, in the ‘Name’ field, enter
hydra-vpnClick the Start icon by the tunnel you want to start:
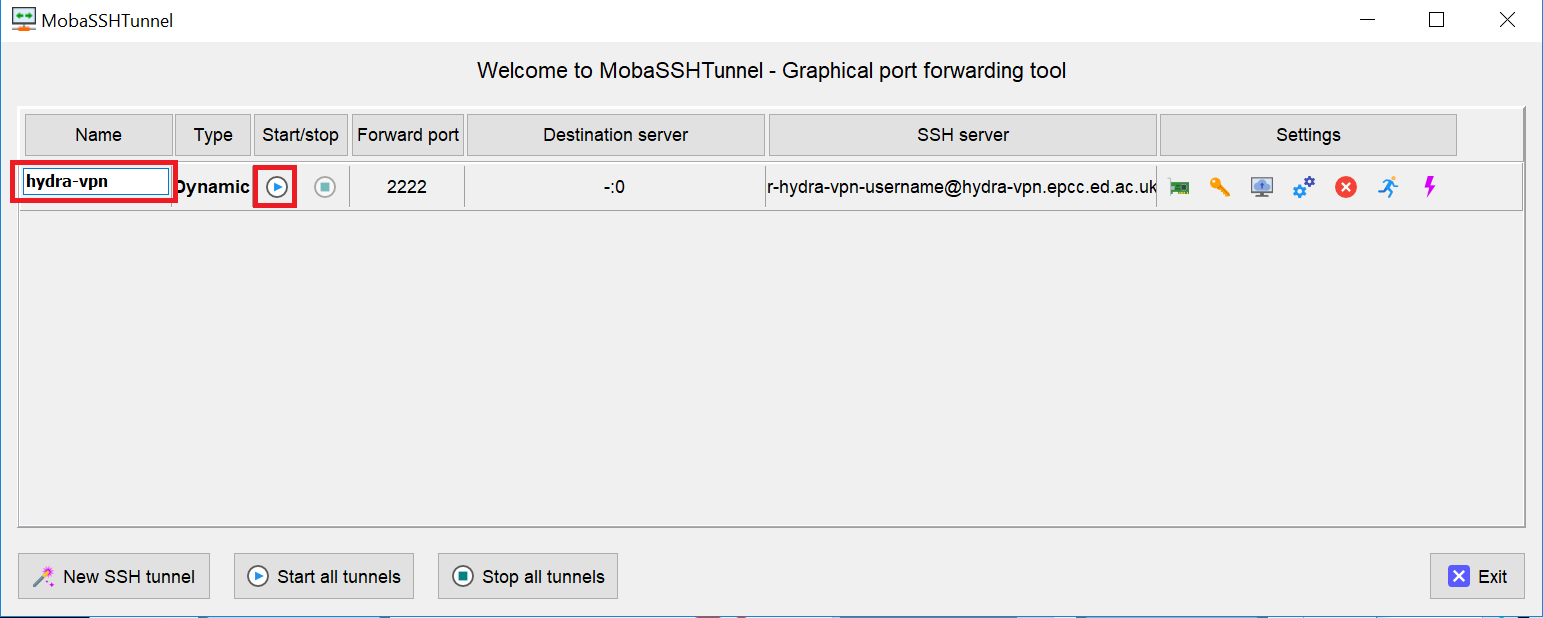
When prompted for your password, enter your hydra-vpn.epcc.ed.ac.uk password.
Click the ‘OK’ button.
Click the ‘Exit’ button.
In future, you can start the tunnel as follows:
- Click the ‘Tunnelling’ icon.
- The MobaSSHTunnel window will appear.
- Click the Start icon by the tunnel you want to stop.
In future, you can stop the tunnel as follows:
- Click the ‘Tunnelling’ icon.
- The MobaSSHTunnel window will appear.
- Click the Stop icon by the tunnel you want to stop.
Set up an SSH tunnel using PuTTY
Start PuTTY.
PuTTY’s Configuration should appear, showing the Session configuration.
In the ‘HostName (or IP address)’ field, enter
hydra-vpn.epcc.ed.ac.uk. See below.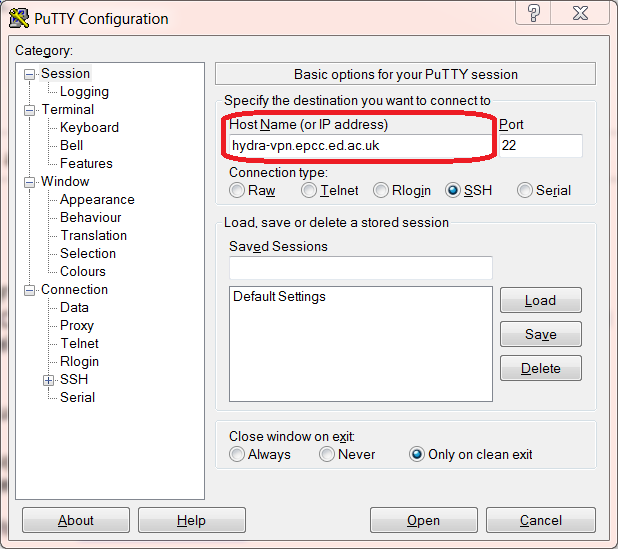
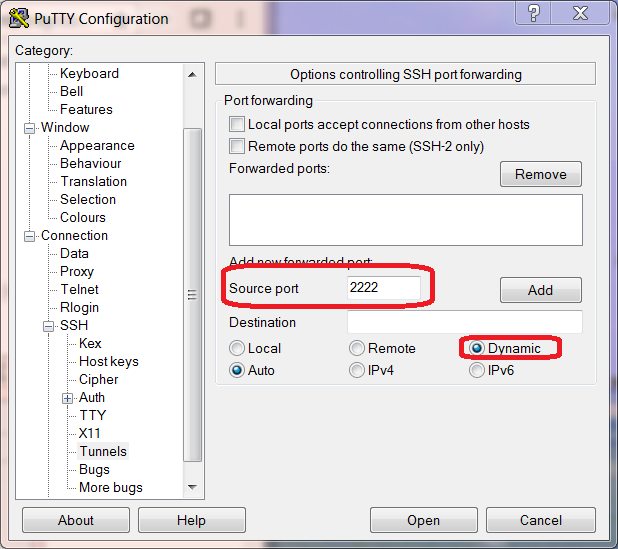
Click ‘Connection’, then ‘SSH’, then ‘Tunnels’ on the left-hand menu.
In the ‘Source port’ field, enter
2222Click the radio button beside ‘Dynamic’. See below.
Press the ‘Add’ button.
D2222will be added to the list of ‘Forwarded ports’. See below.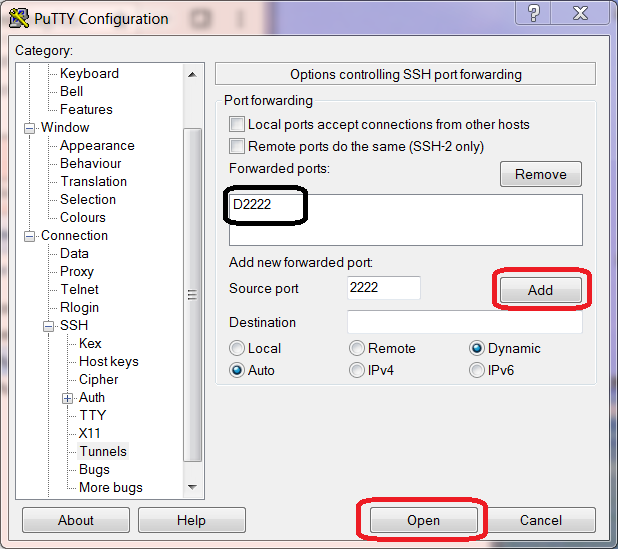
Press the ‘Open’ button.
A PuTTY terminal window will appear. This contains a login prompt. See below.
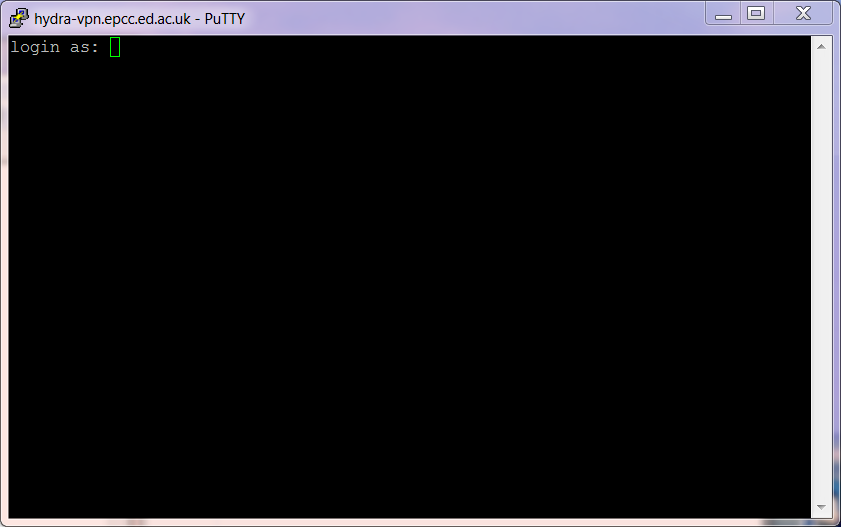
Enter your hydra-vpn.epcc.ed.ac.uk username and password.
Now, skip down to Modify the hosts file.
Set up an SSH tunnel using PuTTY and the Command Prompt
Start a Command Prompt.
Enter the command:
putty.exe -ssh <your-hydra-vpn-username>@hydra-vpn.epcc.ed.ac.uk -D 2222
Enter your hydra-vpn.epcc.ed.ac.uk username and password.
Now, skip down to Modify the hosts file.
Set up an SSH tunnel using Git for Windows
Start a Git Bash command prompt:
- Either, select Start => ‘Git’ => ‘Git Bash’.
- Or, enter
Git Bashinto the toolbar search box.
Enter the command:
ssh -D 2222 <your-hydra-vpn-username>@hydra-vpn.epcc.ed.ac.uk
Now, skip down to Modify the hosts file.
Set up an SSH tunnel using ssh
Open a Terminal.
Enter the command:
ssh -D 2222 <your-hydra-vpn-username>@hydra-vpn.epcc.ed.ac.uk
Modify the hosts file
The hosts file helps to resolves domain names without going via a DNS server. If IP address is found for a domain name then that domain name is used. Here, it is used to map Urika’s IP addresses to domain names.
Edit the
hostsfile. This can be found in the following location:- Windows:
C:\Windows\System32\drivers\etc\hosts - MacOS:
/etc/hosts - Linux:
/etc/hosts
- Windows:
Add the following lines:
172.24.40.11 urika1.turing.ac.uk
172.24.40.12 urika2.turing.ac.uk
If you cannot find the hosts file, or do not have the privileges to modify this file, then please contact your local systems administrator for help.
Here is an example file with these lines added
# Copyright (c) 1993-2009 Microsoft Corp.
#
# This is a sample HOSTS file used by Microsoft TCP/IP for Windows.
#
# This file contains the mappings of IP addresses to host names. Each
# entry should be kept on an individual line. The IP address should
# be placed in the first column followed by the corresponding host name.
# The IP address and the host name should be separated by at least one
# space.
#
# Additionally, comments (such as these) may be inserted on individual
# lines or following the machine name denoted by a '#' symbol.
#
# For example:
#
#      102.54.94.97     rhino.acme.com          # source server
#       38.25.63.10     x.acme.com              # x client host

# localhost name resolution is handled within DNS itself.
#   127.0.0.1       localhost
#   ::1             localhost
172.24.40.11 urika1.turing.ac.uk
172.24.40.12 urika2.turing.ac.uk
Configure web browser to access Urika’s applications software
Once you have set up an SSH tunnel and modified the hosts file, you now need to configure your web browser to access Urika’s applications software.
If you are a Windows, MacOS or Linux user, you can:
If you are a Windows user, you can alternatively:
Configure Mozilla Firefox
Start Firefox.
Open the advanced network settings:
If using Firefox Quantum 60.0:
- Select Menu => ‘Options’
- Scroll down to Network Proxy
- Click ‘Settings…
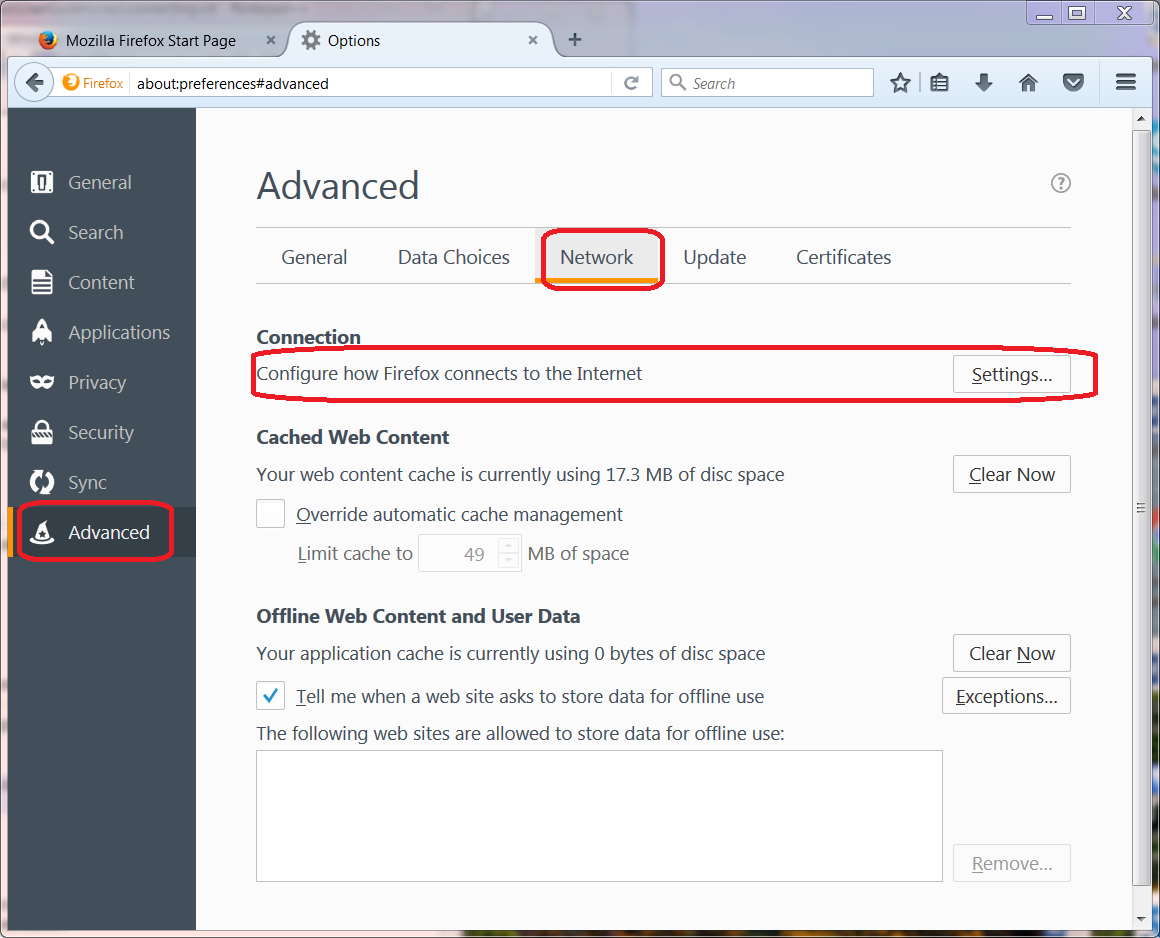
If using Firefox ESR 52.2.0:
Select Menu => ‘Preferences’
Click ‘Advanced’
Click ‘Network’
Click ‘Settings…’, next to ‘Configure how Firefox connects to the Internet’. See below.
Click the radio button for ‘Manual proxy configuration:’.
In the ‘SOCKS Host’ field, enter
localhostIn the adjoining ‘Port:’ field, enter
2222.Click the radio button for ‘SOCKS v5’.
In the ‘No proxy for:’ field, enter
localhost, 127.0.0.1, .com, .io, .net, .org. See below.
Press ‘OK’.
Now, skip down to Use web browser to access Urika’s applications software.
Configure Internet Explorer or Google Chrome on Windows
Both Internet Explorer and Google Chrome use Windows Internet Options.
Note: Changing the Internet Options affects Windows as a whole. You may want to Configure Mozilla Firefox and use it instead if you do not want a system-wide change.
Open Internet Options:
- Via Toolbar Search box:
- Enter ‘Internet Options’
- Via Windows Control Panel:
- Click ‘Network and Internet’
- Click ‘Internet Options’
- Via Internet Explorer:
- Select Cog icon => ‘Internet options’
- Via Google Chrome:
- Click ‘Settings’
- Click ‘Advanced’
- Click ‘System’
- Click ‘Open proxy settings’
- Via Toolbar Search box:
Click ‘Connections’. See below.
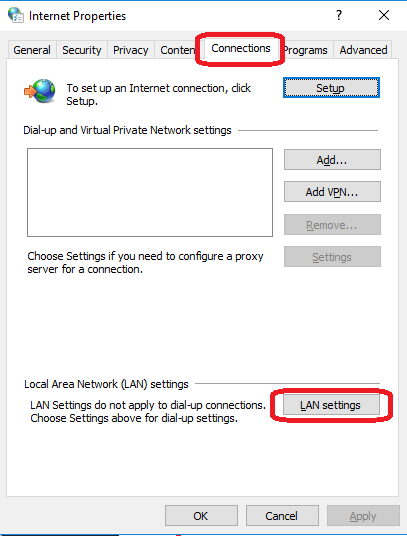
Click ‘LAN settings’.
Click the radio button for ‘Use a proxy server for your LAN…’. See below.
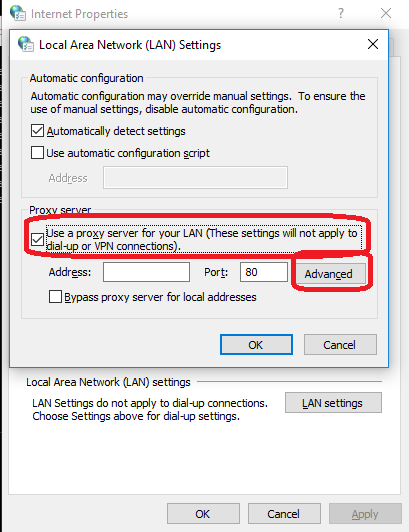
Click ‘Advanced’.
In the SOCKS field, enter:
localhostIn the adjoining field, enter:
2222In the ‘Exceptions:’ field, enter:
*.local; localhost; 127.0.0.1;*.com;*.io;*.net;*.org. See below.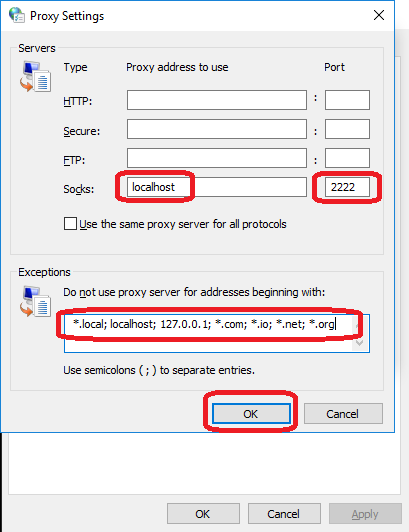
Click the ‘OK’ button
Click the ‘OK’ button
Now, skip down to Use web browser to access Urika’s applications software.
Use web browser to access Urika’s applications software
Once you have set up an SSH tunnel, modified the hosts file and configured your web browser, you can now use your web browser to connect to Urika’s applications software user interface.
Enter:
http://urika1.turing.ac.uk/home
into your browser and the following view of Urika’s user interface will appear.

If you are using Internet Explorer or Google Chrome and you get a warning that This site is not secure appears:
- Click ‘More information’
- Click ‘Go on to the webpage (not recommended)’
Connect to Urika via the command-line
The commands above to Set up an SSH tunnel to Urika also connect to hydra-vpn.epcc.ed.ac.uk via the command-line.
If you do not care about tunnelling or using a web browser then the commands are simpler.
If you are a Windows user, you can do one of:
- Connect to Urika using MobaXterm.
- Connect to Urika using PuTTY.
- Connect to Urika using PuTTY and the Command Prompt.
- Connect to Urika using Git for Windows.
If you are a MacOS or Linux user, you can:
Connect to Urika using MobaXterm
Start MobaXterm.
Click the ‘Session’ icon:

The Session Settings window will appear.
Click the ‘SSH’ icon:

The Basic SSH settings will appear.
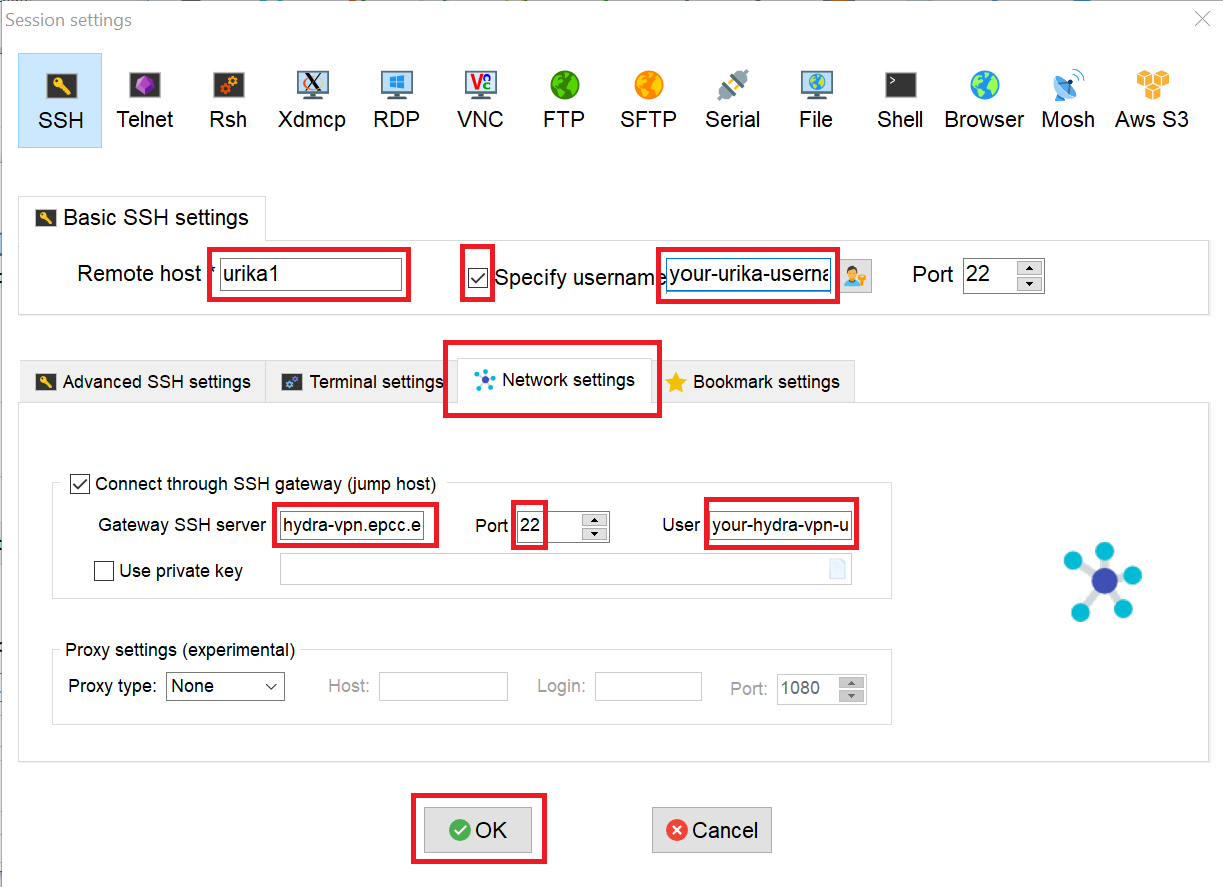
Click the ‘Specify username’ checkbox so it is checked.
Enter the following configuration:
- ‘Remote host’:
urika1 - ‘Specify username’:
your-urika-username - ‘Port’:
22
- ‘Remote host’:
Click the ‘Network settings’ tab.
Click the ‘Connect through SSH gateway (jump host)’ checkbox so it is checked.
Enter the following configuration:
- ‘Gateway SSH server’:
hydra-vpn.epcc.ed.ac.uk - ‘Specify username’:
your-hydra-vpn-username - ‘Port’:
22
- ‘Gateway SSH server’:
Click the ‘OK’ button.
When prompted for your password, enter your hydra-vpn.epcc.ed.ac.uk password.
A terminal window will appear.
When prompted for your password, enter your Urika password.
To connect in future:
- Double-click on
urika1 (your-urika-username)in the ‘User sessions’ area on the left-hand side of the MobaXterm window. - When prompted for your password, enter your hydra-vpn.epcc.ed.ac.uk password.
- A terminal window will appear.
- When prompted for your password, enter your Urika password.
Connect to Urika using PuTTY
Start PuTTY.
PuTTY’s Configuration should appear, showing the Session configuration.
In the ‘HostName (or IP address)’ field, enter
hydra-vpn.epcc.ed.ac.uk. See below.
Press the ‘Open’ button.
A PuTTY terminal window will appear. This contains a login prompt. See below.
Enter your hydra-vpn.epcc.ed.ac.uk username and password.
Now, skip down to Connect to Urika from hydra-vpn.epcc.ed.ac.uk.
Connect to Urika using PuTTY and the Command Prompt
Start a Command Prompt.
Enter the command:
putty.exe -ssh <your-hydra-vpn-username>@hydra-vpn.epcc.ed.ac.uk
Enter your hydra-vpn.epcc.ed.ac.uk username and password.
Now, skip down to Connect to Urika from hydra-vpn.epcc.ed.ac.uk.
Connect to Urika using Git for Windows
Start a Git Bash command prompt:
- Either, select Start => ‘Git’ => ‘Git Bash’.
- Or, enter
Git Bashinto the toolbar search box.
Enter the command:
ssh <your-hydra-vpn-username>@hydra-vpn.epcc.ed.ac.uk
Now, skip down to Connect to Urika from hydra-vpn.epcc.ed.ac.uk.
Connect to Urika using ssh
Open a Terminal.
Enter the command:
ssh <your-hydra-vpn-username>@hydra-vpn.epcc.ed.ac.uk
Connect to Urika from hydra-vpn.epcc.ed.ac.uk
Once you have logged in to hydra-vpn.epcc.ed.ac.uk, you can log into Urika, by connecting to one of its login nodes, via the command-line, as follows.
Either, enter:
ssh <your-urika-username>@u1
Or, enter:
ssh <your-urika-username>@u2
When prompted, enter the password for your Urika account.
You will be presented with the Urika command line.
Note: Urika’s login nodes
Urika has 2 login nodes:
urika1: Alias:u1(as used above). IP address: 172.24.40.11.urika2: Alias:u2(as used above). IP address: 172.24.40.12.
Tested platforms and tools
These instructions have been tested on the following platforms and tools.
- Operating systems:
- Windows 10 Enterprise.
- CentOS Linux release 7.4.1708 (Core) virtual machine running under VMWare Workstation 14 on Windows 10 Enterprise.
- SSH clients:
- MobaXterm Personal Edition v10.9 Build 3656.
- Putty 0.70 64-bit Windows.
- Git for Windows 2.15.1 on Windows 10 Enterprise.
- OpenSSH_7.6p1, OpenSSL 1.0.2m 2 Nov 2017, provided in Git fot Windows 2.15.1.
- OpenSSH_7.6p1, OpenSSL 1.0.2m 2 Nov 2017, provided in CentOS 7.
- Web browsers:
- Mozilla Firefox:
- Quantum 60.0 (64-bit) under Windows 10 Enterprise.
- ESR 52.2.0 (64-bit) under CentOS 7.
- Internet Explorer 11 under Windows 10 Enterprise.
- Google Chrome 66 under Windows 10 Enterprise.
- Mozilla Firefox:
Use of SSH keys
Using SSH keys with an SSH Agent can be used to make access to resources such as Urika more convenient. Further information on how to do this is available in the Cirrus HPC service documentation.